ADVANCED TYPOGRAPHY // TASK 2 : Key Artwork & Collateral
20.09.2021 -11.10.2021 (Week 5-Week 8)
Chaw Zhi Ting (0347344)
Bachelor of Design (Hons) Creative Media
Advanced Typography // Task 2: Key Art Work & Collateral
LECTURES :AdTypo 4_Designing TypeXavier Dupré (2007) in the introduction of his typeface Malaga suggested two reasons for designing a typeface: • type design carries a social responsibility so one must continue to improve its legibility. • type design is a form of artistic expression.
Frutigersans serif typeface designed by the Swiss type designer Adrian Frutiger in 1968Purpose: To create a clean and highly legible at a distance or at small text sizes, specifically for the newly built Charles de Gaulle International Airport in France. Considerations/Limitations: letterforms need to be recognized (even in poor light conditions/ when the reader was moving quickly past the sign) Figure 1.0 Frutiger, 20th Sept 2021VerdanaDesigned by Matthew Carter in 1996, son of Harry Carter — the Royal Designer for Industry, contemporary British type designer & ultimate craftsman.Purpose: the font was tuned to be extremely legible even at very small sizes on the screen (internet and electronic devices)Considerations/limitations: The Verdana fonts exhibit characteristics derived from the pixel rather than the pen, the brush or the chisel. Letterlike lowercase "i j l" were commonly confused.
 Figure 1.1 Verdana, 20th Sept 2021
Bell CentennialDesign by Matter carterPurpose: Create a typeface that maintains readability in small sizes (telephone directories)Consideration/limitations: Printing on cheap absorbent paper and when printing is fast and not very precise. Corners generally tend to suffer from ink traps the corners remain visible
Figure 1.2 Bell Centennial, 20th Sept 2021
Underground Sans/ Johnston SansEdward JohnstonPurpose: Create a typeface with "bold simplicity" for London's Underground railway that is used in posters and signage. Considerations/limitations: Johnston wanted to unite the London Underground Group — the different companies using the same rails & tunnels but, all the signage was all completely different. He applied the proportions of Roman capitals to his typeface, combining traditional calligraphy with elegance & simplicity.
Figure 1.3 Underground, 20th Sept 2021Process of Type Design1.Research: In this stage, it's important to understand type history, type anatomy and type conventions. We should also know terminologies, side-bearing, metrics and identify the type's purpose. Besides, study existing font for inspiration/reference/context/study the pattern is essential.2.Sketching: traditional tool(brushes, pens, ink & paper) or digital toolsets (Wacom) which is quicker3. Digitization: professional software (Fontlab, Glyphs App). We should give attention to the whole form and counter form in order to make sure the readability and legibility.4. Testing: an important step to refine and correcting aspects of the typeface (display type/text type) 5. Deploy: Some issues not seen during prototyping may need revisions at this stage. Typeface Construction:Roman Capital: The grid consists of a square and inside it is a circle that just touches the lines of the square in four places. Thus, using grids (with circular forms) can facilitate the construction of letterforms and is a possible method to build/create/design your letterform.
 Figure 1.4 Roman Capital, 20th Sept 2021
Construction & ConsiderationVisual correction is needed on the extrusion of curved (and protruding) forms past the baseline and cap line, vertical alignment between curved and straight forms and distance between letters. The letters must be altered to a uniform ‘visual’ white space, which is known as ‘fitting’ the type.

Figure 1.5 Classification of letter and form, 20th Sept 2021
Ad_Typo 5Perception in Typography: Visual navigation and interpretation via contrast, form, and organization of the content (textual, visual, graphical, or color)
 Figure 1.6 Revised by Rudi Ruegg
 Figure 1.7 Theory by Carl Dair (principles, texture & direction)
1. Size: draw the attention of the reader, we often see the big letter first before the small, usually a bigger size is used in the headline and title.  Figure 1.8 Example for size, 5th October 2021
2. Weight: we can make the type stand out by bolding it, and utilizing the rules spots and squares.

Figure 1.9 Example for weight, 5th October 2021
3. Form: the distinction between capital letters, lowercase equivalent, and expanded versions of the typeface Figure 2.0 Example for form, 5th October 2021
4. Structure: the combination of different letterforms and kinds of typeface (exp: sans serif and serif, italic and blackletter
 Figure 2.1 Example for structure, 5th October 2021
5. Texture: applying size, weight, form, and structure to a block of text. Texture refers to the way lines of type look as a whole up close and from distance. Figure 2.2 Example for texture, 5th October 2021
6. Direction: opposition of vertical and horizontal and different degrees of angles.

Figure 2.3 Example for direction, 5th October 2021
7. Colour: the second color is less emphatic values than plain black and white.
Figure 2.4 Example for colour, 5th October 2021
Form:- Overall look and feel of elements that make up the typographic compositions, (writing) - to represent a concept in visual form. Balanced harmony of function and expression is created when the meaning and form interplay well. A typeface is perceived as a form when it is manipulated by distortion, texture, enlargement, and extruded into a space.
 Figure 2.5 Example for form, 5th October 2021
Organisation/ Gestalt:- Emphasize the whole is greater than the part. The components/ elements that make up the design are only as good as its overall visual form. While each component may be functional at an elemental level, the sum of its parts is not greater than the whole or the overall form.
 Figure 2.6 Gestalt Principles, 5th October 2021
Law of Similarity:- Gestalt grouping law states that elements that are similar to each other tend to be perceived as a unified group. Similarity can refer to any number of features, including color, orientation, size, or indeed motion.
Law of Proximity: - Gestalt grouping law "elements that are close together tend to be perceived as a unified group". Items close to each other tend to be grouped together and vice versa
Law of Closure:- Refers to the mind’s tendency to see complete figures or forms even if a picture is incomplete, partially hidden by other objects, or if part of the information needed to make a complete picture in our minds is missing.
Law of (Good): -The alignment of the objects or forms plays a major role in this principle as humans tend to perceive each of two or more objects as different, singular, and uninterrupted objects even when they intersect.
Law of Symmetry/ Pregranz:- Organization of the information in the form of laying out complex content in a hierarchical manner requires practice and the knowledge gained herein but also elsewhere.
INSTRUCTIONS:
LECTURES :
AdTypo 4_Designing Type
Xavier Dupré (2007) in the introduction of his typeface Malaga suggested two reasons for designing a typeface:
• type design carries a social responsibility so one must continue to improve its legibility.
• type design is a form of artistic expression.
Frutiger
sans serif typeface designed by the Swiss type designer Adrian Frutiger in 1968
Purpose: To create a clean and highly legible at a distance or at small text sizes, specifically for the newly built Charles de Gaulle International Airport in France.
Considerations/Limitations: letterforms need to be recognized (even in poor light conditions/ when the reader was moving quickly past the sign)
Figure 1.0 Frutiger, 20th Sept 2021
Verdana
Designed by Matthew Carter in 1996, son of Harry Carter — the Royal Designer for Industry, contemporary British type designer & ultimate craftsman.
Purpose: the font was tuned to be extremely legible even at very small sizes on the screen (internet and electronic devices)
Considerations/limitations: The Verdana fonts exhibit characteristics derived from the pixel rather than the pen, the brush or the chisel. Letterlike lowercase "i j l" were commonly confused.
Figure 1.1 Verdana, 20th Sept 2021
Bell Centennial
Design by Matter carter
Purpose: Create a typeface that maintains readability in small sizes (telephone directories)
Consideration/limitations: Printing on cheap absorbent paper and when printing is fast and not very precise. Corners generally tend to suffer from ink traps the corners remain visible
Figure 1.2 Bell Centennial, 20th Sept 2021
Underground Sans/ Johnston Sans
Edward Johnston
Purpose: Create a typeface with "bold simplicity" for London's Underground railway that is used in posters and signage.
Considerations/limitations: Johnston wanted to unite the London Underground Group — the different companies using the same rails & tunnels but, all the signage was all completely different. He applied the proportions of Roman capitals to his typeface, combining traditional calligraphy with elegance & simplicity.
Figure 1.3 Underground, 20th Sept 2021
Process of Type Design
1.Research: In this stage, it's important to understand type history, type anatomy and type conventions. We should also know terminologies, side-bearing, metrics and identify the type's purpose. Besides, study existing font for inspiration/reference/context/study the pattern is essential.
2.Sketching: traditional tool(brushes, pens, ink & paper) or digital toolsets (Wacom) which is quicker
3. Digitization: professional software (Fontlab, Glyphs App). We should give attention to the whole form and counter form in order to make sure the readability and legibility.
4. Testing: an important step to refine and correcting aspects of the typeface (display type/text type)
5. Deploy: Some issues not seen during prototyping may need revisions at this stage.
Typeface Construction:
Roman Capital: The grid consists of a square and inside it is a circle that just touches the lines of the square in four places. Thus, using grids (with circular forms) can facilitate the construction of letterforms and is a possible method to build/create/design your letterform.
Figure 1.4 Roman Capital, 20th Sept 2021
Construction & Consideration
Visual correction is needed on the extrusion of curved (and protruding) forms past the baseline and cap line, vertical alignment between curved and straight forms and distance between letters. The letters must be altered to a uniform ‘visual’ white space, which is known as ‘fitting’ the type.
Figure 1.5 Classification of letter and form, 20th Sept 2021
Ad_Typo 5
Perception in Typography: Visual navigation and interpretation via contrast, form, and organization of the content (textual, visual, graphical, or color)
Figure 1.7 Theory by Carl Dair (principles, texture & direction)
1. Size: draw the attention of the reader, we often see the big letter first before the small, usually a bigger size is used in the headline and title.
Figure 1.8 Example for size, 5th October 2021
2. Weight: we can make the type stand out by bolding it, and utilizing the rules spots and squares.
Figure 1.9 Example for weight, 5th October 2021
3. Form: the distinction between capital letters, lowercase equivalent, and expanded versions of the typeface
Figure 2.0 Example for form, 5th October 2021
4. Structure: the combination of different letterforms and kinds of typeface (exp: sans serif and serif, italic and blackletter
5. Texture: applying size, weight, form, and structure to a block of text. Texture refers to the way lines of type look as a whole up close and from distance.
6. Direction: opposition of vertical and horizontal and different degrees of angles.
Figure 2.3 Example for direction, 5th October 2021
7. Colour: the second color is less emphatic values than plain black and white.
Figure 2.4 Example for colour, 5th October 2021
Form:
- Overall look and feel of elements that make up the typographic compositions, (writing) - to represent a concept in visual form. Balanced harmony of function and expression is created when the meaning and form interplay well. A typeface is perceived as a form when it is manipulated by distortion, texture, enlargement, and extruded into a space.
Figure 2.5 Example for form, 5th October 2021
Organisation/ Gestalt:
- Emphasize the whole is greater than the part. The components/ elements that make up the design are only as good as its overall visual form. While each component may be functional at an elemental level, the sum of its parts is not greater than the whole or the overall form.
Figure 2.6 Gestalt Principles, 5th October 2021
Law of Similarity:
- Gestalt grouping law states that elements that are similar to each other tend to be perceived as a unified group. Similarity can refer to any number of features, including color, orientation, size, or indeed motion.
Law of Proximity:
- Gestalt grouping law "elements that are close together tend to be perceived as a unified group". Items close to each other tend to be grouped together and vice versa
Law of Closure:
- Refers to the mind’s tendency to see complete figures or forms even if a picture is incomplete, partially hidden by other objects, or if part of the information needed to make a complete picture in our minds is missing.
Law of (Good):
-The alignment of the objects or forms plays a major role in this principle as humans tend to perceive each of two or more objects as different, singular, and uninterrupted objects even when they intersect.
Law of Symmetry/ Pregranz:
- Organization of the information in the form of laying out complex content in a hierarchical manner requires practice and the knowledge gained herein but also elsewhere.
INSTRUCTIONS:
TASK 2: KEY ARTWORK & COLLATERAL
TASK 2 (A): Key Artwork
For this task, we are to use initial letters of our name or your full
name, i.e., Onn Aditya Hussein, OAH, OA. We are advised to explore and
compose as many permutations and combinations of these initials. The
final key artwork must be an elegant solution, not complicated or
confusing that leads to a functional and communicable key artwork. This
key artwork will subsequently be used in Task 2(B) on various
collateral(e.g. poster/mug/invitation).
J C: permutations (options) combination,
*look at the negative space of the letter form
Other than design, what will u be (letter on your name)
*Can use any type and color
*Artboard size (scalable)
Monogram / not a wordmark
As Mr. Vinod remind us that the key artwork we design need to be related
to a career that we wanted to be other than the designer. Thinking back,
my ambition is to be a kindergarten teacher to facilitate, take care of
the children and teach them drawing. "Kindergarten" is often depicted as
fun, cheerful, and childlike. I began to consider what components or
styles would best represent these terms.

Figure 1.0 Inspiration 'Tangram' game, 25th Sept 2021
Tangram is a dissection puzzle consisting of seven flat polygons,
called tans, which are put together to form shapes. With this
inspiration, I started to sketch out my ideas for "J C".
Figure 1.1 Sketches, 25th Sept 2021
After having the rough idea, I move on to digitize the process, where
I found more possibilities of the key artwork. Tiny little changes
have given the design a different style and look.
Figure 1.2 Digitize key artwork, 25th Sept 2021
Figure 1.3 Top 4 Key artwork, 25th Sept 2021
After the feedback session, design #4 got approved and I decided
to explore with some colour. For this step, I refer back to the
Tangram game reference I had previously and extract the colour palette
from there.

Figure 1.4 Process of Key artwork, 25th Sept 2021
FINAL SUBMISSION:

Figure 1.5 Final Key artwork [B &W version], 4th Oct 2021

Figure 1.6 Final Key artwork [Coloured version], 4th Oct 2021

Figure 1.7 Key artwork Sticker, 11th Oct 2021

Figure 1.8 Key artwork Signage, 11th Oct 2021

Figure 1.9 Key artwork Signage, 11th Oct 2021
Figure 2.0 Key artwork Submission.pdf, 11th Oct 2021
TASK 2 (B): POSTER, INVITATION & COLLATERAL
Poster:
Moving on to the poster, I took so much time to think of how to make
it different from the key artwork yet remain the same characteristics.
However, when I started to explore the elements, I tend to forget the
iconic 'shape' element of my key artwork. So I started to look back at
my key artwork design and develop the poster design. Then, applying
the knowledge we have learned, I used modular typographic systems most
in laying out the information.

Figure 2.1 Moodboard for poster, 25th Sept 2021
I started the design of making use of the key artwork as the main
element, to make a 3D-like space with a light ball and putting the
relevant information such as Event title, slogan, keywords, contact info
and a QR code for participants to scan. My initial idea was to create a
computer game type of design with pixel elements.

Figure 2.1 Poster designs draft #1, 25th Sept 2021


Figure 2.3 Poster designs #2 and #3, 25th Sept 2021
After several attempts, I realised there is a lack of a similar theme
between my key artwork and the poster. Therefore, I try to create a
composition using the basic elements of my key artwork and enlarge it
to make it the background. I also tried to use some bright colours
to make the poster more playful and fun. However, it seem to be a
little bit distracting when I put the information in. Therefore, I
decided to use the previously colour palette which is black, and grey
with minimal blue and orange.

Figure 2.4 Poster designs exploration with bright colours, 25th Sept 2021


Figure 2.5 Key artwork and colour palette, 25th Sept 2021
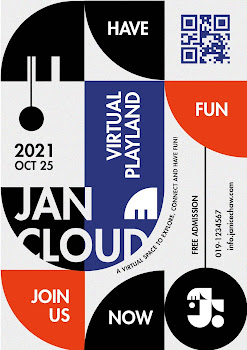
Figure 2.6 New poster design, 25th Sept 2021
After feedback: the information seems to be too much, need to adjust point size and the contact details can have a better solution.

Figure 2.7 Before and after amendments (progress), 11th Oct 2021

Figure 2.8 Final poster with grid, 11th Oct 2021

Figure 2.9 Final poster. jpg, 11th Oct 2021
Invitation:
Once the poster design is finalized, I started to plan the animation for the invitation. To begin with, I search for some references on Youtube to study the flow or mood that I want. Then I move on to create a simple storyboard to visualize the movement of the elements.

Figure 3.0 Loop Animation reference, 4th Oct 2021

Figure 3.1 Loop Animation draft, 4th Oct 2021

Figure 3.2 Loop Animation elements, 4th Oct 2021
After having a visualise idea in mind, I started to export to Ae to play with the elements. It took me some time to animate and decide the relationship and continuity of each element. In this process, it's all about try and error! Don't give up on trying different possibilities to get the best effect you want :)

Figure 3.3 Progress of editing the elements, 4th Oct 2021

Figure 3.4 Progress of masking the text, 4th Oct 2021

Figure 3.5 Progress of animating the moving 'ball', 4th Oct 2021
Figure 3.4 Progress of masking the text, 4th Oct 2021
Figure 3.5 Progress of animating the moving 'ball', 4th Oct 2021
After having a rough cut, I keep replaying and make suitable adjustments on the keyframe to improve the flow and movement. Then slowly add the information above the background. Finally, Tadaa! Although is not that perfect I would say, overall I am satisfied with the outcome of the invitation.

Figure 3.6 Final Invitation, 4th Oct 2021
Collateral:
For JanCloud collateral, I plan to design something for both kids or
adults who visit the launching event. Therefore, I simplified the
design from the poster to the print on the bottle and goody bag.


Figure 3.8 Final water bottle for visitors, 4th Oct 2021


Figure 4.0 Print design, 4th Oct 2021

Figure 4.1 Final goody bag design, 4th Oct 2021
FINAL SUBMISSION:
Occupation: Kindergarten teacher
Organiser: Janice Chaw
Event lanch: JanCloud (a virtual playland) launching event
Event lanch: JanCloud (a virtual playland) launching event
Slogan: Explore, Connect & Have Fun!

Figure 4.2 Final poster design, 15th Oct 2021

Figure 4.3 Final Invitation GIF, 15th Oct 2021

Figure 4.4 Water bottle collateral, 15th Oct 2021

Figure 4.5 Goodie bag collateral, 15th Oct 2021

Figure 4.6 Flat lay, 15th Oct 2021
Figure 4.7 Final Task 2B.pdf, 15th Oct 2021
COMPILATION TASK 2A & 2B:

Figure 4.8 Final Task 2A &2B.jpg, 15th Oct 2021
Figure 4.8 Final Task 2A &2B.pdf, 15th Oct 2021
HOURS SPENT:
TASK 2
[Part A] Identify story, visuals, pullquote and subtext: 12 hours
[Part B] Visuals: 25 hours
FEEDBACK:
Week 2
General Feedback: Pay attention to the text formatting, and paragraph spacing. Due to time constraints, make sure the work on illustration and something we are able to execute well. Have to do the pull quote and subtext today. Visuals can be abstract, metaphors to allow room for imagination (something Interesting). Blog posts need to be featured chronologically. Attach the doc on both Exercise & Content Generation Blog posts.
Specific feedback: It's okay to have 5000 words+ and 4 chapters. Add copyright need to add the author's name. First-line before imprint (student projects, no commercial profit). Each chapter consists of 3 subtexts and 1 pull quote.
Week 3
General Feedback: The text must be connected, flow the text to see how many pages of text. Always click on the master page to set the columns, Leading 2-3, With paragraph spacing is more friendly, if removed then add indentation. Watch the Youtube video before adding the page number.
Specific feedback: Exercise (point size is okay, number of characters in one line is good) remember to set to facing pages, can try out different font sizes for subtext.
Visual style: The art direction is okay, reflects the fortune teller and tarot (with border, texture). Try out different colour palettes/different shades to reflect mysteriously, visit the colour hunt. Pullquote can be one spread/one page (play with typography)
Week 4
General feedback: Illustration 70% black, highlight colour 30%. Be selective to use the highlight. It can be background as well.
Specific feedback: Visual's style is consistent, be cautious of using colour and edgy shapes, and it might hurt the eye when everything is put together in a book. The one with white eyes and teardrops is great. May consider adding more negative space and toning down the illustration.
Week 5
General Feedback: For long reading, avoid choosing a font that has high contrast (Bodoni). Next week complete and update all exercises, including your own grid system and story + apply typography.
Specific Feedback: Text needs to make sure it flows starting and ending in the same grid system. Type specimen sheet, don't put visual first focus on the type.
REFLECTION:
Experience:
Through the entire process of completing task 2, it was enjoyable,
challenging at the same time. The beginning part of this exercise was
challenging when we developed ideas that reflect an occupation using our
initials. As task A and B is a continuation, the key artwork is
crucial to help us decide on a particular design direction and style.
After so many attempts, I'm glad that my key artwork idea works. The
poster design allows us to revise what we have learned in the
typographic system to lay out the information. It is great to keep
practicing the theory. After several attempts, I managed to come up with
a poster that reflects the style of the key artwork. The invitation was
the most challenging part for me. I find it hard to visualize the flow
of the pattern and information. Therefore, I start by doing a rough
storyboard to dissect the part. Then I studied more motion graphic
references to allow the info delivered clearly in a fun manner. I
searched for many animations
Observations:
Consistency of a style and colour use plays a vital role to reflect a
design concept. Observing other references or others' good artwork
sparks my inspiration to choose the type I want. Meanwhile, I always
remember that Mr.Vinod reminds us to be rational and critical when
looking at other people's work to avoid making something that is not
"ours".
Findings:
This task allows us to adapt to a 'real' design world to propose a
design concept and direction to represent a brand with a good design
solution. Besides, it's critical to keep track of our time with multiple
tasks to produce quality work.
FURTHER READING:

Figure 1.0 Brand Design Article by Workerbee, 25th Sept 2021
This article showcase different type of brand design including
shape branding, typography branding, color branding. A logo
alone not be strong enough to represent the culture and brand values.
That is the reason why brand design is needed to reflect a company's
brand value and personality which is able to stand out from the
competitors.

Figure 1.1 Logo Design by Tubik Magazine, 16th Oct 2021
It is critical to have an effective visual sign in order for a business, brand, or service to be identified immediately and remembered for a long time. This book demonstrates how important it is to choose a suitable representative sign, also known as a logo, that serves as the foundation of the whole branding strategy. Efficient logo design is a complex strategy that includes all the stages of the design process
and marketing such as user research, marketing and creative research then move on to the choice of style direction and colour palette to create a style guide.


Comments
Post a Comment