DIGITAL PHOTOGRAPHY & IMAGING// WEEK 4

19.04.2021//Week 4
Chaw Zhi Ting (0347344)
Bachelor of Design (Hons) Creative Media
Digital Photography and Imaging
LECTURE// WEEK 4Today, the lecturer start the class with an adjustment layer in Photoshop, at the end of the day we might able to create our filters to present the work with our style. The adjustment layer is non-destructive image editing tools that add colour and tonal adjustments to your image without permanently changing its pixels.
1. Brightness/Contrast: Adjusting the highlight
2. Level: Adjusting levels of shadows, midtones and highlights
3. Curve: Most powerful and precise tool to edit the tones in image
4. Exposure slider:- Exposure will adjust only the highlights of the image
- Offset adjusts the mid tones
- Gamma will adjust the dark tones only
5. Selective color: selectively modifies the amount of a primary color without modifying the other primary colors
Figure 1.0 The adjustment layer in Photoshop, 19th April 2021 Figure 1.1 The effect before and after adjusting hue and saturation, 19th April 2021
1. Brightness/Contrast: Adjusting the highlight
2. Level: Adjusting levels of shadows, midtones and highlights
3. Curve: Most powerful and precise tool to edit the tones in image
4. Exposure slider:
- Exposure will adjust only the highlights of the image
- Offset adjusts the mid tones
- Gamma will adjust the dark tones only

Figure 1.0 The adjustment layer in Photoshop, 19th April 2021

TUTORIAL:
In this video, we learned about tools and techniques to retouch photos and images in Photoshop. A dramatic filter is created by combining the photo filters, blend modes and adjusting suitable lighting and contrast. It's amazing to see how the image transformed from the original image, it added emotions and story in it.
Source : https://youtu.be/gDSbfx67MLg
PRACTICAL// DIGITAL COLLAGE
For this week task, we will experiment to apply filters and blending mode in our previous selected collage to make it more interesting and dramatic. It looks very interesting and I can't wait to explore the filters and blending options.

Figure 2.0 Chosen digital collage, 19th April 2021

Figure 2.1 Progress on making filter, 19th April 2021

Figure 2.2 First filter, 19th April 2021
FILTER#1: It was fun to add mood and details to this composition. With the use of blending mode, the typewriter is added with an interesting fish print to make it look more exclusive. In the city building as well, I blended in the fish texture to give it more tone and character. The newspaper is placed at the centre to give a sense of balance and harmony. Besides, with the usage of the colour white, red round it looks like Japanese-style art.
 Figure 2.3 Second filter, 19th April 2021
FILTER #2: With the minimal usage of filter, I use blending effects more in this picture. By adding fish texture on the typewriter and the buildings. It reflects the significance of detailed parts of fish. I had experimented to place the texture on the object to make them more outstanding. The newspaper is placed below which represents a table, which adds a sense of space in this composition.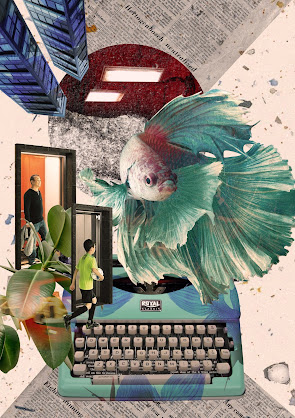 Figure 2.3 Third filter, 19th April 2021
FILTER #3This filter is more of a vintage style which gives warmth and an old-school effect. The tones, grain and light effects give an impact like a photo that has been kept for a long time with memories. The idea of adding triangle pieces of yellowish newspaper in the composition is to create a visual of an envelope and in it might have someone’s letter.
FINAL SUBMISSION:
Figure 2.4 Final digital poster pdf version, 19th April 2021
REFLECTION:I was impressed to see Photoshop Adjustment Layers are a great group of tools that allow us to smartly edit images in a non-destructive way. If the original pixels are preserved, we can change or adjust the edits later. Thus, it makes work easier and efficient. Adding effects and filters in a photo might look easy but it was challenging at the same time. It needs more practice and experimentation to get a good effect and outcome.
TUTORIAL:
In this video, we learned about tools and techniques to retouch photos and images in Photoshop. A dramatic filter is created by combining the photo filters, blend modes and adjusting suitable lighting and contrast. It's amazing to see how the image transformed from the original image, it added emotions and story in it.
Source : https://youtu.be/gDSbfx67MLg
PRACTICAL// DIGITAL COLLAGE
For this week task, we will experiment to apply filters and blending mode in our previous selected collage to make it more interesting and dramatic. It looks very interesting and I can't wait to explore the filters and blending options.

Figure 2.0 Chosen digital collage, 19th April 2021

Figure 2.1 Progress on making filter, 19th April 2021

Figure 2.2 First filter, 19th April 2021
FILTER#1:
It was fun to add mood and details to this composition. With the use of blending mode, the typewriter is added with an interesting fish print to make it look more exclusive. In the city building as well, I blended in the fish texture to give it more tone and character. The newspaper is placed at the centre to give a sense of balance and harmony. Besides, with the usage of the colour white, red round it looks like Japanese-style art.

Figure 2.3 Second filter, 19th April 2021
FILTER #2:
With the minimal usage of filter, I use blending effects more in this picture. By adding fish texture on the typewriter and the buildings. It reflects the significance of detailed parts of fish. I had experimented to place the texture on the object to make them more outstanding. The newspaper is placed below which represents a table, which adds a sense of space in this composition.

FILTER #3
This filter is more of a vintage style which gives warmth and an old-school effect. The tones, grain and light effects give an impact like a photo that has been kept for a long time with memories. The idea of adding triangle pieces of yellowish newspaper in the composition is to create a visual of an envelope and in it might have someone’s letter.
FINAL SUBMISSION:
Figure 2.4 Final digital poster pdf version, 19th April 2021
REFLECTION:
I was impressed to see Photoshop Adjustment Layers are a great group of tools that allow us to smartly edit images in a non-destructive way. If the original pixels are preserved, we can change or adjust the edits later. Thus, it makes work easier and efficient. Adding effects and filters in a photo might look easy but it was challenging at the same time. It needs more practice and experimentation to get a good effect and outcome.


I like the way you present your works. Informative & organize.
ReplyDeleteGood job on the experimenting different filters. I would like to suggest to you to choose the FILTER #2 to be submit. The composition is great and the colors is just nicely blend!
Good job Janice!
- FY